Photoshop Elements - B/W with Color


Black and White Photo with Some Color
Learn how to convert your photo to black and white, but make one subject pop with a touch of color. Adding a color highlight to a black and white photograph can really add to the wow factor of a photo. It also draws the eye to that subject and makes it pop out, or adds a bit of warmth or emotion to the picture. As with most things, it isn't difficult to bring out a bit of color, you just need to know how to do it. Adobe Photoshop Elements (PSE) has a wide variety of editing features and tools, many of which overlap, which make it possible to get the same result in several different ways. This site will describe one of the ways to leave a bit of color in a digital photo, when you convert it to black and white. Sometimes one set of tools works better than another, depending on the colors involved, or what the desired outcome is. Don't be afraid to experiment and see which you find easier, or which one gives a better result.
Make any necessary corrections to your photo first. Adjust the brightness, sharpness, or any other editing that you feel is necessary.

Convert Your Photo to Black & White
As with just about everything in Photoshop Elements there are several ways to convert your color photo to black and white. Open your digital photo file in Photoshop Elements, then select Layer - New Adjustment Layer- Hue/Saturation. This will create a new layer, that you will see on the right hand side of your screen. You will see a Background layer, and above it, a Hue/Saturation layer. Click on the white rectangle of the Hue/Saturation layer: the adjustment controls will appear. Move the arrow below the Saturation line all the way to the left to desaturate the photo. This will give you a black and white layer of the photo, with the original full color photo in the layer below.
For more ways to convert a photo to black and white, visit this site: Convert to B & W.
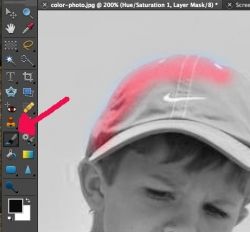
Add Color Back into the Black / White Photo
Now that you have a black and white adjustment layer, you can start to bring back some color. First click on the white rectanlge of the adjustment layer on your right hand side. Then make sure that your color picker has the foreground set to black. Next click on your paint brush, and select a size that is appropriate for the area that you want to color. "Paint" over the area where you want to bring back the original color. If you make a mistake and color too much, change your color picker to white, then paint over the area that you want to change back to black and white. Sometimes it is helpful to zoom in on your photo, so that you can work with finer detail.

Need Help Painting in the Lines?
Use the Quick Selection Tool
Sometimes the area you want to paint can be tricky, or simply it is a very obvious area. In these cases, Photoshop Elements' quick selection tool can be your friend. Choose the quick selection tool, then go around the edges of what you want it to select. With high contrast areas it often does a very good job of selecting your subject matter. If it accidentally selects too much, simply click on the "-" sign, then go back over those areas to deselect them. Once you have the area you want selected, you can now use your paint brush on a large setting to paint the entire area. Your paint brush can go outside the lines of the selected area without it bringing the color through. It kind of acts like a stencil, only allowing you to bring out the color in the selected area. You will find there are times when this makes your job very easy, and other times when it is necessary to do the detail work yourself.
Finishing the Photo Editing
When you have your digital photo with just the right amount of added color in your black and white image, you can choose Layer - Flatten Image to complete the process and merge the layers. Then choose File - Save As - and be sure to select Jpg as your format, unless you want another format.
If however, you want to consider making more changes or bring back more color, do not flatten the image, and instead save the file as a psd file, so that you can continue working on it, with the layers still intact, at another time.

If you found this helpful, please share, like it or "pin it" on pin interest. Thanks!


